Showing posts with label apples. Show all posts

Monday, November 18, 2013

Roasted Delicata Squash and Apples {12 weeks of Winter Squash}


Are you in charge of bringing a side dish to a Thanksgiving dinner this year? I usually am known as the one who will bring a healthy and "amazing" dish. My sister-in-laws always seem so impressed and amazed at the "unique/interesting/lovely" appetizers I bring to the collection of mashed potatoes, green bean casseroles and Holiday ham.  I'll let you in a little secret though if you promise not to tell………


I usually spend a total of about 30 minutes on most of  the side dishes and appetizers I bring to just about any party but most especially Holiday dinners. 
Shhhhhhh, our little secret!


It doesn't have to look or taste like you threw something together though and it most CERTAINLY doesn't need to come out of a box or a can! Fresh fruits and veggies always have a way of shining all on their own with very little need of help in the way of additives, sauces or a ton of spices.

This side dish is sweetened with a touch of honey, which you can't really tell is in there but compliments the earthy flavors of the squash and apples and will help the kiddos eat their healthy veggies happily. {o.k. I had 1 out of 4 kids who didn't like it but hey, those aren't bad odds!)


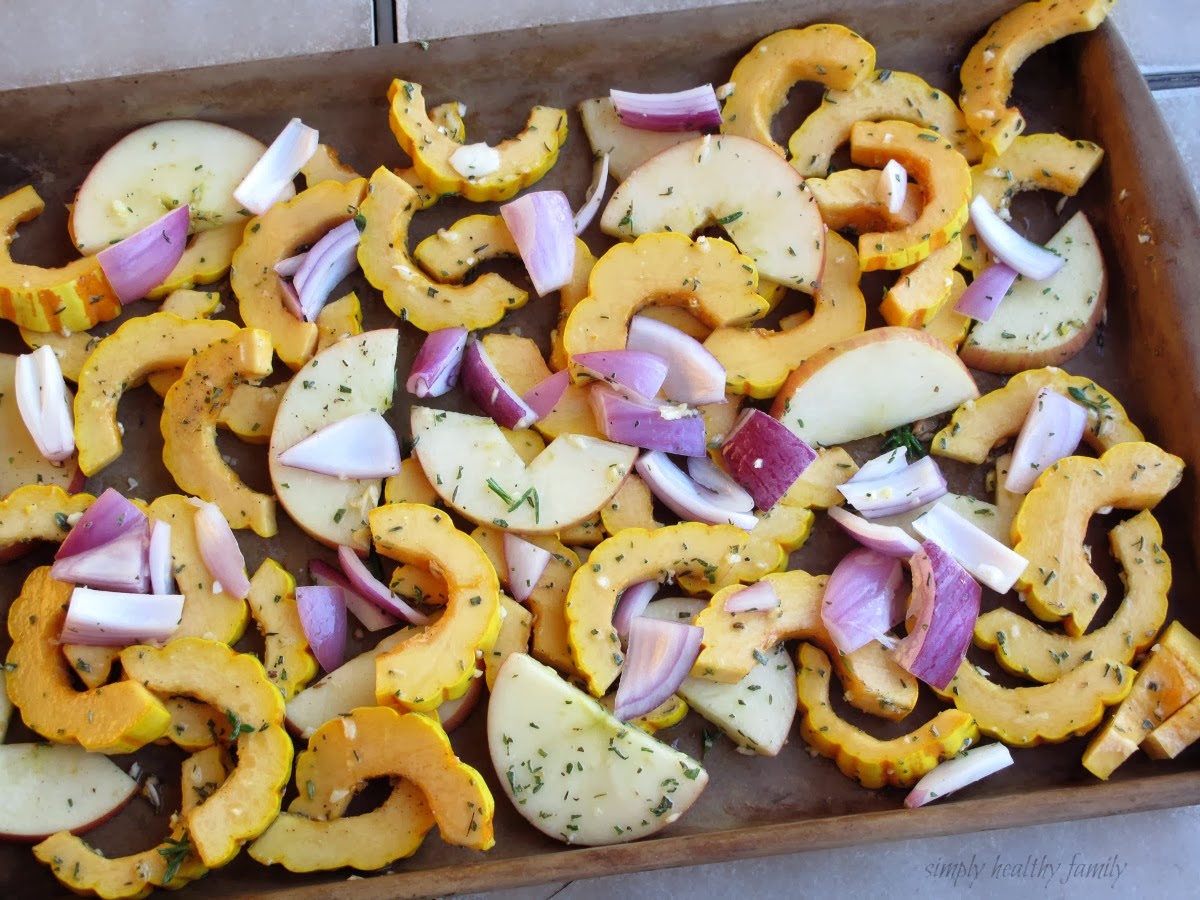
I adore squash in all of it's varieties but this is the first time (I made this dish at least twice before posting as usual) that I've had delicate squash. I am now in love. Love at first taste actually. This is hands down the easiest of ALL squash to prepare. Simply cut the ends off, slice in half lengthwise with ease thanks to the very light skin, scoop out the small bit off seeds and roast. 

Bam!


This side dish will go alongside some other fabulous squash dishes my fellow squash loving bloggers have made for week 3 of 12 weeks of winter squash. Only 12?!!! 


SERVES    6           TIME    30 MINUTES        
Ingredients
  1. 1 tablespoon unsalted butter, melted 
  2. 1 tablespoon chopped fresh thyme
  3. 1 tablespoon honey
  4. garlic cloves, sliced
  5. 2 small delicata squashes, halved lengthwise, seeded, and cut into 1/2-inch slices
  6. 2 fugi (or similar) apples cut in half lengthwise, cut into 1/2 inch pieces, any seeds removed
  7. 1 small red onion, cut into 12 wedges
  8. 1/2 teaspoon salt
  9. 1/2 teaspoon freshly ground black pepper
  10. 3 tablespoons chopped fresh flat-leaf parsley

  1. Combine first 5 ingredients in a large bowl, stirring with a whisk. Add squash and onion; toss gently to coat. Sprinkle vegetable mixture with 1/4 teaspoon salt and 1/4 teaspoon pepper. Carefully remove preheated pan from oven; coat pan with cooking spray. Spread vegetable mixture evenly on baking sheet. Bake at 475° for 20 minutes or until tender, turning once. Sprinkle with chopped fresh parsley.
If not serving immediately, cover with foil. 


Other Thanks Giving Day Sides and Appetizers from Simply Healthy Family


Do you share my love for winter squash? Join the party and link up and share a yummy squash recipe you made this week! Don't got squash? No bigs. Just link up next week!


Friday, October 25, 2013

Apple Cider & Pomegranate Popsicles {and a Give Away}


These naturally sweetened popsicles are a perfect early fall treat. We are loving the cooler weather here in The Valley of the Sun (by cooler I mean in the 90's) and sitting out on the back patio with one of these popsicles is a special after school treat for the boys. Little miss thinks that "Popsicles are the World's greatest of all foods ever!" I'll have to agree with her on this one.


With the overload of sweets and candy that seem to be everywhere in late October I am especially happy to give these to my kiddos for a special treat. Apple cider and pomegranate have lots of vitamins and antioxidants to fuel the bod.


I really loved the combination of sweet, spiced apple cider and 
mouth puckering tart pomegranate in these.


Zoko sent me one of their pop makers to trial and I gotta say, I'm very impressed! Not only can you pour just about any combination of flavors and ingredients in the Zoku including yogurts, fresh fruit and nuts and have a cold, sweet treat in less than 10 minutes but they don't come out freezer burned and rock hard like the popsicles I've made in the past. Totally cool.... get it....cool?  O.K. fine 80's humor aside these popsicles rock! ;}


Love the cute, modern design! What color would you choose?


Next on my list? Chocolate pops! Thanks goodness these freeze super fast for those last minute chocolate emergencies!
photo source: Kid Crave


You Will Need

1 cup vanilla almond milk (helps the pops to not be like an ice cube in texture)
1 cup apple cider
2 tablespoons real maple syrup (not the artificially flavored kind)
1/2 teaspoon real vanilla
dash of cinnamon
1/2 cup pomegranate juice

Pour the pomegranate into the Zoku maker and let sit 5-6 minutes
Blend the remaining ingredients in a blender till combined.
Using a small funnel, pour the apple mixture into the Zoku, on top of the now frozen pomegranate juice.
Wait another 5-6 minutes and watch as they freeze in front of your eyes on your countertop!


Give Away is for 1 triple Zoku pop maker (they also come in single and duo) in the color of your choice, a $49.95 value.
Winners must live in USA or Canada


a Rafflecopter giveaway


Thursday, January 24, 2013

Apple Cider-Squash Penne with Swiss Chard, Toasted Walnuts and White Balsamic Cranberry Grilled Chicken.


It's been unusually cold and rainy here in Phoenix. Enough so that we had to dig through our closets and find our thick, cozy sweaters and dust them off accordingly. Even thought it has been in the low 40's when I wake up and head to work around 6 a.m. I still feel a bit silly piling on my mismatched layers of sweaters and jackets. It doesn't help that the only pair of mittens I own are both left handed. Odd.  and the only scarf I own is way dated and thread bear. I have to wrap it tightly around my neck several times to keep warm, which isn't easy to do wearing 2 left handed mittens.


So needless to say, I have been on a bit of a soup binge for the last couple of weeks. I love soup and have to get my fill before the temperatures jump to 80 next week. True story. Love Phoenix.


 I have the only kids in the Universe who aren't fans of spaghetti and meatballs. Maybe if I used a sugary pasta sauce instead of a home made marinara? 


They did love this pasta that I whipped up using one of the many boxes of healthy pasta that Barilla was kind enough to send me. This one is a "White Fiber" pasta and I dolled it up by roasting an  squash  and then blending it up with some apple cider. 
Just sweet enough to be a yummy dinner that everyone liked.


image source


Prep time     20 minutes           Cook time    50 minutes       Serves    6 
Ingredients:1 package Barilla White Fiber Penne Pasta1 small acorn or butternut squash2 chicken breasts1 small bunch Swiss or rainbow chard (preferably Organic)1 handful walnuts, chopped1 apple (Fuji, Macintosh, gala) diced1 cup apple cider or juice1/2 cup chicken broth (or water)3 tablespoons white balsamic vinegar divided. (I used a white balsamic-cranberry)1 tablespoon extra virgin olive oil divided1 teaspoon saltfreshly cracked pepper to taste (I used white pepper)


Putting it all together: 

Preheat oven to 400F. 
 Using a sharp paring knife, cut skin off of squash. Cut squash in half lengthwise and scoop out seeds and strings.  Cut into 1 inch pieces and place on grill pan  Bake at 400F for 30 minutes until a fork pierces flesh easily and squash is browned. Remove from oven, set aside to let cool slightly.
Cut chicken into thin strips. Place in small bowl and add 1 tablespoon white balsamic vinegar, 1 teaspoon oil and a dash of cracked pepper.  Grill for 5-7 minutes on a hot grill pan, turning once. Remove, set aside. 
Meanwhile, wash chard and remove stems. Chop stems into 1/2 inch pieces, set aside. Chop leaves of chard into small pieces.  In a hot skillet add 1 tablespoon oil. Add chard stems, cook 2 minutes. Add leaves, cook 5 more minutes stirring occasionally. Add chopped apples. Cook 3-5 minutes. Add 2 tablespoons white balsamic vinegar, toss to coat.  Cover and remove from heat. 
Cook pasta according to package directions. 
Place half of the cooked squash in a blender. Add apple cider, broth and salt. Blend till smooth and creamy adjusting liquid to desired consistency.  Drain pasta. Return to pot, turn off heat. Add squash mixture, toss to coat. Add chard, apple and squash pieces to pasta, toss to combine. 

Top with chicken.  Adjust salt and pepper to taste.


Pasta can be a great source of good carbohydrates to fuel your body for exercise. When I make pasta I like to add lots of veggies, fruits and healthy toppings like nuts and good cheeses such as
 Romano and Parmesan. 


Barilla sent me a nice variety of their healthy pastas. I've cooked with Barilla Plus a few times before in my Pasta with White Clam Sauce.   They are offering to send a box full of a variety of their healthy pastas and an apron to TWO lucky Simply Healthy Family readers.


Barilla Pasta is a nutrient-rich, complex carbohydrate that is a good source of thiamin, folic acid, iron, riboflavin and niacin. It’s low in sodium and naturally cholesterol free.
Barilla PLUS offers a taste, color and texture as good as traditional Barilla pastas, and is a good source of protein, ALA omega-3 and fiber. It delivers 44 percent more protein and almost twice as much fiber than traditional pasta.


This time around I used the White Fiber pasta which they claim tastes just like regular pasta but with 3 X's the fiber and provides 30% of the DRV for whole grains all from natural ingredients.  Our family loved it!


With Barilla White Fiber, eating well can be fun for the whole family. Available in
three varieties, Mini Rotini, Mini Shells and Mini Penne, Barilla White Fiber looks
and tastes just like regular pasta, letting your whole family enjoy their favorite pasta
meals, while also providing them with a hidden boost of the fiber and whole grains
they need.


In order to win:

Leave a comment below telling me what your favorite healthy pasta dish is.

Not required to win, but greatly appreciated:
Follow Simply Healthy Family by signing up to recieving healthy recipes by email or adding Simply Healthy Family to your favorite reader or following me on GooglePlus.


TWO winners will be chosen at random on Thursday, January 31st. Winners will be notified by email so make sure you leave a valid email address in your comment.

One extra entry by Pinning an image from this post. Leave me a link so I can follow you!


Friday, October 21, 2011

Just for Fun Friday.

Happy Friday everyone! Despite the kids being sick and trying to drag me down with them for the last couple of weeks I am keeping my spirits high and focusing on the changing of the season. I love Fall and we are ready for some cooler weather here in Phoenix for sure. It's a little depressing that it never really cools down enough to adorn all of the cute cold weather styles that I love like tall boots, cute coats and lovely scarves unless I go at at night which doesn't happen very often these days, kids crampin my style..... the darlings. But a girl can dream can't she?

I am also itching to visit some where that is bursting with autumn color and feeling, some place where there are front porches with pumpkins and potted plants, lawns with orange, yellow and red leaves scattered about and apples and pears that haven't traveled across the country to reach us out here in the desert.


I can't wait to go Trick-or-Treating this year with the kids {assuming they aren't sick}. We found a cute little neighborhood nearby that is built from mid-west architecture in mind with all of the for-mentioned things I mentioned and cobblestone streets, beautiful lush landscaping and a very festive and small town feel. This is very exciting for us since most all of the houses here in Phoenix are stucco 'cookie cutter' homes and small, rocky front yards with no personality.


What are you most excited for about Fall?

Where do you live and what do you enjoy about it?


xo


just for fun Friday......


boots


pirate boat


Wednesday, January 26, 2011

Baked Golden Delicious Apples with Raisin Crisp Filling

This is one of those recipes that you kick yourself for not discovering sooner. These stuffed apples were absolutely wonderful. Simple. Healthy. Deliciousness! We were eating them hot, right out of the oven with the cool, winter Arizona air blowing through our open windows. We had a light picnic lunch of grilled salmon over crisp lettuce with orange bell peppers and home made garlic-Dijon dressing. These apples were the perfect light and savory dessert for our backyard picnic. We had one leftover and I packed it for Jack as a nice surprise for his school lunch the following day, he was so happy.


Eat them hot, right out of the oven. Just pick them up and take a big bite.
Let the warm apple juices drip down your chin
and savour the crisp, sweet filling.


Golden Delicious apples work best, but any variety will do.
Wash apples thoroughly under cool, running water.


Cut 1 inch off the tops of the apple, rubbing a halved lemon over the exposed apple as you go.
Using a pairing knife or apple corer, core the apple. Make sure to not go to close to the bottom.


In the bowl of a food processor, combine a handful of chopped walnuts, a handful of golden raisins, a pinch of brown sugar and smaller pinch of cinnamon.
Pulse just 2 or 3 times till chopped. Don't emulsify. You could just use a knife too.
Using your fingers, stuff the filling into the cored apples.

Place filled apples into a baking dish with 1/2 inch of water on the bottom.
Bake at 350F degrees for 25-30 minutes until apples are soft when pierced with a fork.


Pack up for a warm picnic treat on a cold day. Or a special dessert any time!


Friday, December 10, 2010

Oatmeal Apple-Pecan Breakfast Cake


This is going to be our new Christmas morning breakfast tradition, it's that good and that easy.
This apple-pecan breakfast cake was absolutely delicious and with zero added sugar! Toasting the oats and pecans really add a wonderful old-fashion home-made quality. The baked apples were sweet and perfect.

 My 5 year old comedian Jack said "This apple cake tastes just like heaven!" ;)


Toasted Whole Grain Oats ( We love Coach's Oats brand)
Can you see the difference between these whole grain oats and 'quick oats'?


Simple


You Will Need:

1 cup toasted pecans

2-3 granny smith apples, peeled and chopped

1 cup whole-wheat (whole grain) flour

1 cup oat flour + 1 TBSP for sprinkling on top (I toast Coach's Oats in oven and grind in food processor)

1 tsp baking powder
1/4 cup flax meal
½ teaspoon kosher salt

1 tsp ground cinnamon  + 1 tsp for sprinkling on top

1 tsp vanilla

1/4 cup Earth Balance (or butter), melted

1/2 cup pure maple syrup + 1 tbsp

1/3 cup unsweetened applesauce


Directions:
Toast oats and pecans (separately) in 400F oven for 12-15 minutes. Remove from oven. Grind oats into flour using a mill or food processor.
Turn oven down to 350F. Peel and chop the apples. Grease a small casserole dish and then spread 1 tbsp of maple syrup on the bottom of dish. Now, spread a layer of chopped apples followed by a layer of pecans on the bottom of dish. Use just less than half of both the apples and pecans.
In a large bowl, mix the following dry ingredients (whole wheat pastry flour, Oat flour, baking powder, kosher salt, cinnamon).  In a small bowl mix the wet ingredients (applesauce, 1/2 cup maple syrup, vanilla, and 1/4 cup melted Earth Balance (or butter). Mix. If to dry, add a couple tablespoons of water.

Add the wet to the dry and mix well. Now spread on a layer of this batter over top of the apples and pecans. Use about half of the batter.

Now spread a layer of apples and pecans again, making sure to leave at least 2-3 tbsp of each for the top of the cake. Follow this by a final layer of the cake batter (use all of it up). Spread as evenly as possible.

Now sprinkle on the remaining apples and pecans. Mix a bit of oats with tsp of cinnamon and sprinkle all over top. Place in the oven for 55 mins at 350F. Allow to cool for at least 15 minutes before serving.


I'm sending this over to Hearth 'n Soul and also Bella Vita Blog Hop's!
hearthandsoulgirlichef

Monday, November 1, 2010

Apple Slaw


Simple, old fashion recipes. These are my favorite. My kids too! This is the best blend of flavors, tangy, sweet and wonderful. This reminds of a leisurely day outdoors. If the weather isn't always as sunny as it is here in Phoenix, you could always make this simple apple slaw alongside these home made cornmeal fish sticks and have an indoor picnic! Yay!


Celery seed, if you've never tried it is really good and gives even more flavor to this dish.
I use plain, fat free yogurt as a base instead of mayo so it's much healthier for you. Yogurt's smooth, creamy texture and tanginess (is that a word?) is perfect in coleslaw... I mean appleslaw.
The cider vinegar gives it the classic tartness of coleslaw.
The apples give it some sweet crunch.
Sweet golden raisins make this a sweet treat.
Agave nectar is a perfect compliment to the tartness.

Sweet and tangy! Yum!


Serve it with homemade baked garlic fries and cornmeal crusted fish sticks.


recipe:SERVES 6 TIME 10 min
5 cups cabbage mix (green cabbage and shred carrots)
3 cups pre shredded purple cabbage
2 cups plain, fat free yogurt
1 tablespoon unfiltered apple cider vinegar (filtered/refined foods are over processed and have less nutrients in them.)

2 tablespoons celery seed
2 tablespoons mayo (did you see it hiding in shame in my photo? ;-)
2 tablespoons Agave Nectar
2 green apples, sliced thinly ( I used my KitchenAid thin slicer attachment)
1/2 cup golden raisins
1 tsp ground black pepper

Mix it all together, chill for an hour before serving.
Impress your family and friends by serving this at your next BBQ!


I am posting this on Kitchen Corners for the November Cook off featuring Apples!


Tuesday, September 14, 2010

Grandma's Apple Pie, minus the Crust... and the Sugar.


O.K. you got me, it's applesauce. But it tastes just like the best home made apple pie filling I have ever had minus all the sugar. So in my humble opinion, it's a million times better! Honestly, this was so, so delicious that if you try this you will never ever buy the jarred stuff again, it's That good! Not only is this crust less apple pie delicious, but super quick... lightning fast I tell you. You can have fresh, warm cinnamony applesauce in less time than it would take you to drive to the store. The kids will L.O.V.E making this with you too. Mine thought they were pretty important when they "smushed" the apples all by themselves and gave a bowl full of "Apple Smosh" to daddy. While I was peeling all of 8 apples it took to make a big batch of applesauce the boys and I did a little Math. I'm sneaky that way. "We have 3 peeled apples and 5 more in the basket, how many apples do we have?"

I've done a little cost breakdown analysis for you just in case your now won over by now.


Mott's Applesauce:

average price for 32 oz. jar = $3.49

Ingredients include: Apples, High Fructose Corn Syrup, Corn Syrup, Water And Ascorbic Acid To Maintain Color.

Cost to make your own: 6 cups/48 oz. = $2.89
* using red delicious apples bought in bulk
I'm not great at math, but that's a pretty big cost savings!


MAKES 6 CUPS
You Will Need:

8 large Apples ( I used Red Delicious because they were cheapest)
1/2-1 cup water or apple juice/cider
1 tablespoon ground cinnamon
1 teaspoon ground nutmeg


Putting it all together:


Peel and core apples. Throw into pressure cooker with 1/2 cup apple juice. Cook on 1st red ring for 2 minutes. Bring pressure down naturally. Add cinnamon and nutmeg.


If using pot. Bring 1 cup apple juice and cored, sliced apples to low boil. Cover, cook 10-12 minutes until apples are soft. Add cinnamon and nutmeg.


Using a potato masher, let your kids mash the apples to desired consistency.
For a special treat, serve warm over Vanilla Bean Ice Cream! Yumm Me!