Showing posts with label SEAMO4CDI. Show all posts

Thursday, March 15, 2012

Carrot-Date Energy Ballz


Right now in the valley of the sun it smells sickly sweet like orange blossom heaven. It only last for a few short days when the dozens of orange trees that line so many streets here in Arizona start to bloom. The petite white flowers make me swoon as I drive home from work taking in deep breaths of the fragrant, cool March air. Add that to the brilliant multi colored desert sunsets behind the darkening mountains that surround us here and I am in euphoria.


It makes me miss one of my closest and dearest friends, Becky. She went to school with me here in Phoenix many, many years   not to long ago and the blooming orange trees were one of her most favorite things. She moved back to her home town of Indianapolis shortly after we graduated but she keeps coming back here to visit me as often as life permits...... usually around orange blossom season. I so do wish I could bottle up natures most perfect fragrance for her.


PHOTO CREDIT


I'm glad that this no-cook, no-fuss sweet and healthy snack that I'm going to share with you has orange zest in the ingredient list, otherwise my little story would seem superfluous, because I always have a well thought out point to my ramblings and didn't want to throw you all off......  errrr.


I just love healthy grab-and-go snacks, especially when they take all of 10 minutes to throw together. I cringe when I see people with all of the boxed, processed "health" snacks in their carts and wonder if they really believe that they are healthy and convenient.

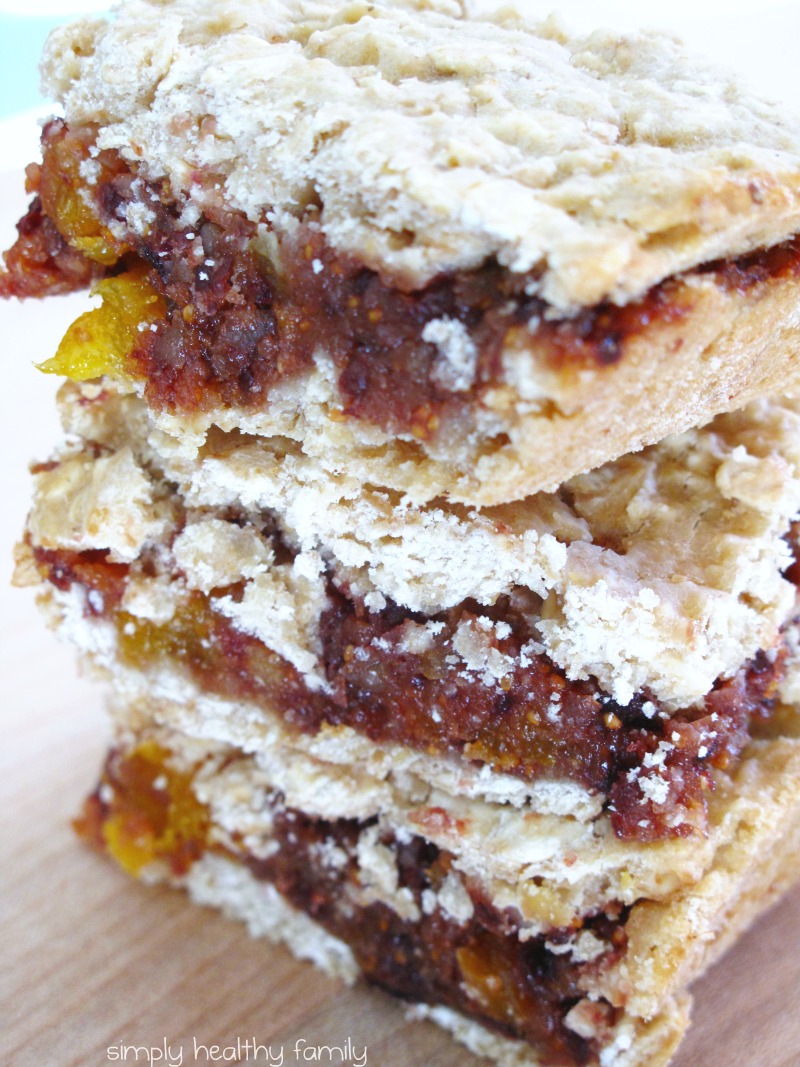
I found this recipe on Skinny Jeans Food and was pleasantly surprised at how amazing these little snacks were. I was a bit skeptical about the raw oat thing but they turned out to be one of our new favorite snacks. Sweet, simple and the orange zest really made the flavors POP.


Eight ingredients, THAT'S IT!


Using a food processor to finely shred your carrots is key to getting the ballz to stick together.


Chia Seeds are an excellent source of fiber, fatty acids, proteins, vitamins, and antioxidants. They are also the richest source of Omega-3 fatty acids among non-marine whole food items


I used barley oats instead of regular oats because they were in my freezer but after doing some research it seems that barley oats are higher in {nutritional} calories and a bit lower in fiber and protein than regular oats. So unless someone knows of a good reason other than to help your teenage wrestling champion put on some weight than I'm going to stick with regular whole oats next time.


Grind the oats to a fine consistency in your food processor.


Silvia at Skinny Jeans Foods named these wonderful goodies Amaze Ballz  and  fittingly so. I enjoyed them at work for an afternoon pick me up and just two of them kept me satisfied until dinner.  I brought a couple with me hiking for an energy boost and packed them in kids lunch boxes for a fun surprise.


Skinny Foods site is dedicated to single serving portions for those of you without an army to feed. I obviously had to double this recipe. They didn't last long between school snacks and me grabbing a couple every day to take with me on my adventures. Next time I will make even more as they keep well in an airtight container in the refrigerator.


Amaze Ballz


1/2 cup rolled oats
5 medjool dates (the organic ones at whole foods are amazing!)
7 walnut halves, chopped
1 TB chia seeds
zest of one orange
1/2 TB maple syrup
1/2 ts vanilla extract
1 carrot, grated

Pour the rolled oats in the food processor and chop until finely ground. Remove the pit of the medjool dates, and chop them with a knife. Add piece by piece to the ground oatmeal flour (so that they distribute better). Process long enough that the mix starts to get sticky. Now add the remaining ingredients, and processes until the mix comes together (quite a sticky dough). Take small portions and roll them between your hands in a ball like shape. Store in the fridge! Enjoy!

1 amazeball: 54kcal


This post is linked to:

For the Kids Friday

Friday, December 30, 2011

Quick Swiss Ham Bake

While this photo is not one of my best, this last minute 'throw together' dinner turned out so yummy that I just had to share it with all of you. This took minutes to throw together and can be altered to your liking. I used Swiss cheese but Gruyere would be perfect in this as well. Use ham, Canadian bacon or turkey bacon if you prefer. I used broccoli because my kids love it but spinach or any veggie you like can be added.  

The trick is sauteing the white parts of a green onion, leek or a minced shallot and  then browning the ham. Meanwhile, you want to whisk your eggs very well with a splash of milk. Add your salt, pepper and seasoning (I used tarragon)
and then pour the eggs into your oven ready pan. Wait a minute, then push the eggs towards the center of the pan, working your way around once or twice till the eggs just start to set. Sprinkle on your grated cheese then pop it in a pre-heated oven at 450F for 8-13 minutes (depending on how many eggs you used).

Voila! Dinner is served.


Friday, December 16, 2011

Golden Glittered Poinsettas ~ Home Made Gift Giving


Usually this time of year I'm completely stressed out, cranky and worn to bits. The endless 'To Do' list is insurmountable and catches me off guard every year. I decided to take a different approach this year and make things much simpler for myself and my family. While I can't say I've completely succeeded, I am definitely feeling happier and full of the Christmas spirit for the first time in a while.

Usually, in the weeks preceding Christmas I spend most of my time worrying about buying the perfect gifts and then end up forgetting what I've actually purchased and end up frantically running from store to store in the days before Christmas buying junk that will be tossed aside in the matter of minutes.

No more I say! No more. All of my friends said I wouldn't stick to my convictions, but not only have I managed to not buy oodles of things and masses of prettily packaged rubbish but I have found a way to keep things simple and personal with small, home made gifts from the heart.


People just want to feel loved and cared about. I know I do. Even if you don't have lots of money you can probably find a way to let the people you care about know it with a simple gift from the heart.


Do you bake? Drop by a neighbors home with a small batch of cookies and make their day.
Are you crafty? No? Me neither. Pick up a poinsettia and  spray a bit of Gold Glitter on the tips of the leaves  and watch it transform into a beautiful Holiday centerpiece.


This falls under the category  "SEAMO4CDI"!
{So Easy a Mom of 4 Can Do It}


Thursday, November 17, 2011

Roasting a Turkey 101 {Excellent tips and tricks for a perfect turkey!}

If you've never roasted your own turkey for Thanksgiving because you thought it was to hard I'm here to make your day. It falls into the category "So easy, a mom of 4 can do it.". There are a million different recipes and ways to cook your Thanksgiving turkey from brining, roasting, deep frying and smoking. There are also a ton of different tutorials out there that had me hesitant to pick one up and give it a go for fear of ruining a perfectly good turkey.


For the last few years I've been popping a turkey in the oven for a mini Thanksgiving dinner for our little family, mostly for the leftovers. It's wonderful to share the holidays with the whole fam but we were sad every year that we couldn't wake up the next day and have a turkey cranberry sandwich for lunch. This is when I decided to bite the bullet and buy a turkey.

Last year, I chose an Organic turkey from Trader Joe's and was oh so pleased with the juicy, natural tasting meat that we got from it. I've never brined a turkey but have heard wonderful things about it. I was pleased to see that my Trader Joe's turkey was already brined {honestly, I don't think it's absolutely necessary but try for yourself}. All I did was rinse it off, rub under the skin with an oil and herbed mixture and then pat the outside with butter to make it moist and golden brown.  

Voila!  Mamma made a turkey! 


How to Roast a Turkey  {the easy way}


1. To choose a turkey you will calculate 1 pound per person on a turkey up to 12 lbs and 3/4 lb per person on a turkey up to 24 lbs. This is because the bigger the turkey the more meat to bone ratio. I like to get one bigger so we have left overs.


2. Prepare Turkey. The biggest mistake I made the first time I made a turkey was not leaving enough time for it to thaw (this was before my Trader Joe's turkey which was fresh). I thought I could take a huge frozen turkey and stick it in the fridge a day or two before Thanksgiving like I would a small chicken and be fine. BIG mistake. It was still frozen solid and we had to wait 2 more days.  Ooops.  You could probably stick it in a clean sink with water, but I never liked that option.


3. Cleaning your Turkey. Again, several tutorials that involve a lot of steps, but really you just need to pull out the innards if they haven't been already and place the thawed Turkey on a rack over  sink and carefully rinse it inside and out with cool water. Pat dry with paper towels.


4. Turkey Spa Treatment.  I haven't stuffed my turkey but prefer rather to make a separate sour dough or corn bread stuffing. Therefor, I discard the innards. Now, place your clean and dry turkey, breast side up in a deep roasting pan with a wire rack on the bottom. In a small food processor or with a knife, finely chop a couple of tablespoons of fresh rosemary, thyme and 1/2 a cup of yellow onion (minced finely).   I find that garlic goes well with chicken and onion with turkey.  Add a tablespoon of olive oil and a pinch of good quality sea salt to the herb and onion mixture and mix together. Pull back the skin of the turkey with one hand and using your other hand push between the skin and the meat to separate the two without removing the skin. Now, using your hand, spread the herb mixture under the skin, onto the meat. Cover as much area as you can. 


The turkey loves this, 'Gobble, Gobble!.   Think of it as a herbal facial.


Now it's time for the turkey's massage treatment. Using a small piece of slightly softened, real butter, rub the entire skin of the turkey. This browns the turkey nicely and locks in moisture. A moist and tan turkey is a happy turkey.


Cooking the turkey. I know you're supposed to use a meat thermometer but I don't have one, bad mommy. Most turkeys come with a little pop up thingy that lets you know when it's done anyway. A meat thermometer would be nice to have though especially if you are a novice cook. It can also let you know how close to being done your turkey is so you can prepare the final touches of your dinner.


Place turkey breast side down in a large roasting pan with a wire race placed on the bottom. I have found that placing the turkey breast side down allows for the juices to run down through the breast as it cooks making it even moister.  Now, loosely cover your turkey with heavy tin foil or place in a cooking bag. This is important!  You don't want a dried out turkey.


Place your turkey in an oven preheated to 325 degrees F. Do not add water to the pan. If using a meat thermometer, cook until the temperature reaches 180 degrees F and juices run clear.
For an  unstuffed  turkey that is 8-12 lbs turkey you will cook it for approximately 3  - 4  hours. Add about 15-20 minutes for every extra pound. Stuffed turkey take a bit longer. A good chart can be found here.


When done, carefully remove turkey from oven and place on a carving platter. Let cool for 10 minutes before carving.  Admire your beautiful turkey! 


I should have turned him around for his photo shoot, oops.


 Happy Holidays from Simply Healthy Family!


Did I miss anything?
What turkey tricks do you have up your sleeve?


Friday, July 29, 2011

My Secret Weapon to Beat the Heat. Strawberry-Coconut Smoothies P.S. Dear Monsoon: Please hurry.


Rain would be a true God send right now here in Phoenix. It always looks like even the cacti are going to give up and die during the endlessly long summer's here. I guess too much of anything can wear on one's nerves. Come July, after most people get tired of mindlessly commenting or joking about the stifling dry heat, all one can do is wipe off the continual beads of sweat rolling down their necks and pray for the monsoon.

Monsoon season is nothing short of a true miracle. Natures wrath at her finest. After months and months without a single drop of rain the sky darkens without notice and beautiful violent rains pour from the wakened sky and hit the hard, cracked desert floor. There is no drier dust than that found in the Arizona desert in July. Just when the cacti start to wilt and the weary desert animals are ready to call it quits, God sends them relief. And He doesn't skimp on the job. 

The smell is my favorite part of the monsoons. It's no ordinary rain. The layers of dust and sand that have accumulated on the streets and in my nose can only be washed away by the heavy rains of August. I wait anxiously starting mid July for the chance to sit outside amidst the sheets of rain and furious winds that wash every trace of dust from the startled desert. It lasts only for a few minutes but is enough to quench the deserts thirst for many more months. It is energizing   refreshing   uplifting invigorating and restores even the most lifeless soul.


During these long, hot months in the desert it is difficult to want to eat, let along cook anything. We need to save every single ounce of energy that we have so that the heat doesn't drag us down and reduce us to ashes. Water is our best friend but my secret weapon is coconut water which instantly rejuvenates me and gives me the energy to make it through the entire days obstacles which includes getting the mail while the sun is still out.

You think I'm joking?


Coconut Water + Frozen Berries =  Extreme Heat Blaster


When I'm feeling like I want a sweet treat and need some extra refreshing, I always go for these Strawberry-Coconut smoothies. They take all of 3 minutes to make and are a gazillion times healthier (and tastier IMO) than milk shakes or fast food smoothies. I think it important to note that even the drinks labeled "Real Fruit Smoothies" are not in fact good for you. At all. Period. And that includes popular Juice Joints. Sorry.


I keep a big bag of frozen berries from Costco in my freezer and plenty of coconut water around to make these smoothies throughout the summer months. They taste even better when sitting in the pool oddly enough. :)


This post is linked to

Fresh Food Friday

Friday, March 25, 2011

Chardonnay Poached Salmon with Fennel and Orange - In the Crockpot!

I just wanted to make sure that this recipe was front and center. It may have been over looked  in my last post since the title suggested a post about wine and the fact that I was a Mad House Wife {in a cute and love able way}.

I am still dreaming about this recipe. It was perfect in every way. 
It was very simple and fuss free with only a few ingredients and prep work.
It was the most delicious salmon I've ever had in my life, and that's a lot.
The kids ate every bite of their second helpings and happily scooped up the salmon and veggies into their endive lettuce cups. I was thrilled that they were devouring healthy endive and loving it.
Lastly, using a crock pot was genius (I'm not tooting my own horn, I saw the method in Taste of Home magazine). It literally ensures a perfectly cooked and moist salmon.


So here is the recipe. Front and center. Please give it a try, I know you'll love it too.

You can serve the salmon like this for a pretty Hors d'oeuvers or fun, healthy and kid friendly finger foods
or, simply serve the fish over some cous cous.


Cous Cous with cinnamon, curry and currants


You Will Need:


2 lbs. *wild salmon fillet, skinned.
1 cup fresh orange juice
2 cups chardonnay (I used Mad Housewife)
1 bulb fennel, sliced
1 small red onion, sliced
1 tablespoon capers
1 teaspoon French grey sea salt


Garnishes:
Endive lettuce cups
1 Orange thinly sliced
Fennel fronds


Putting it all together:

Fold a 36 inch piece of aluminum foil lengthwise to a width slightly larger than the salmon fillet. Place foil in a 4-6 qt. slow cooker with foil ends hanging over the handles.


Combine orange juice, Chardonnay, fennel, onion, capers and salt in the slow cooker. Place salmon on top. Cover and cook on high heat setting for 45-60 minutes.

Test salmon for doneness at 45 minutes by using a fork to gently pull at salmon. When it easily flakes it is done. Test every 5 minutes after 45 min until done.

When salmon is done, remove it from the slow cooker by carefully lifting the ends of the foil and placing it on a platter. Using a fork, scoop into endive cups, crackers or on top of cous cous. Dollop with a bit of Caper Creme Sauce, recipe to follow.


Caper Creme Sauce:

1/2 cup heavy cream
2 tablespoons sour cream
2 tablespoons orange juice
2 tablespoons red onion, diced
1 tablespoon capers
Tabasco or Hot sauce if you please


Whip cream with sour cream and orange juice until soft peaks form, about 3 minutes. Gently fold in capers and onion, season with hot sauce if you like.


Into the slow cooker you go. See you in 45-60 minutes.

capers add the all important salt factor to the fish


Like this post? Love my blog? Please vote for me

{Healthy Mamma}
It would mean the world to me!
(I'm currently on page 3, #125)  ;}


Thanks!


This post is linked to


Thursday, January 13, 2011

Old-Fashioned Fig Bars: A Gift for Your Favorite Teacher!


It's pretty easy to eat healthy and feed your children healthy foods while in your own home, but what about when they walk out the door to school? While I realize that I can not control everything my children do and eat while I'm not watching (don't tell them that, I told them mom's see everything! ;) I can at least arm them with the knowledge and life skills to make better choices for themselves.  *crossing fingers, deep breath in.....
Also, it is not only within my power, but my responsibility as a mother to make sure I do my part in keeping their little bodies healthy and strong. I believe that a very big part of that means making home made foods and snacks as often as possible.

Fruit and veggies make up a big part of our snacks around here. Luckily my kids are used to this and so they are not tossing them out and holding out for crackers, goldfish, bagged cookies, gummy yummies or whatever. I make simple (key word being simple here guys, I promise), healthy snacks to send with my little ones to school and for my toddler and preschooler at home. I love that they think of these healthy snacks as special treats, in part because helping mommy in the kitchen is just plain old fun to a 4 and 5 year old. Also, home made just tastes better!


 My Kindergartners friends try to trade their packaged cheese sandwich crackers for his healthy, home made snacks that he brings. In fact, I took my two little ones to have lunch with Jack at the school cafeteria yesterday (what a treat that was ;) and I thought I would surprise Jack and let him go through the line with us, it was hamburger and hot dog day after all. Jack was very excited to show us around and get his little brother and sister a juice but he was actually disappointed that he couldn't eat the lunch I sent with him that morning (it was a last minute surprise to go have lunch at the school.). 

Not only that, but the other Kindergartner's remembered me from a field trip a couple of months ago when I shared some home made pumpkin-oat bars with them and asked what I had today! Sorry guys, we only brought enough for the teacher. It is my hope still, that these kids will tell their parents about these healthy snacks and that they prefer them over the 'snack packs'.  A girl can hope can't she? Maybe I'll sneak one of my cards into their backpacks. ;)

So, like I mentioned, I wrapped up a few of these delicious Old-Fashioned Fig Bars and brought them with me so Jack could give them to his teacher whom he adores. She loved them of course and shared with another teacher standing by who couldn't believe they were sugar-free, gluten-free and vegan!
(It's all the rage right now :)


Did You Know?

The Fig Newton was named after the city of Newton, Massachusetts, a suburb of Boston. Kennedy Biscuit Company, which merged into the National Biscuit Company (now shortened to Nabisco) in 1898, was based in Massachusetts, and named several of its cookies after surrounding towns. The Newton, first produced in 1891, was the most successful, and is the only one that survives today.


This is What's In the Packaged (Fig Newtons) Variety:

Ingredients: ENRICHED FLOUR (WHEAT FLOUR, NIACIN, REDUCED IRON, THIAMINE MONONITRATE {VITAMIN B1}, RIBOFLAVIN {VITAMIN B2}, FOLIC ACID), FIGS PRESERVED WITH SULFUR DIOXIDE, CORN SYRUP, HIGH FRUCTOSE CORN SYRUP, SUGAR, SOYBEAN OIL, WHEY (FROM MILK), PARTIALLY HYDROGENATED COTTONSEED OIL, SALT, BAKING SODA, CALCIUM LACTATE, MALIC ACID, SOY LECITHIN (EMULSIFIER), POTASSIUM SORBATE ADDED TO PRESERVE FRESHNESS, NATURAL AND ARTIFICIAL FLAVOR.


INGREDIENTS:  Organic Figs. PERIOD, End of Story.


**Did you know that dried apricots get their pretty orange color from
Sulfar Dioxide and Potassium Sorbate?
Organic, Natural dried apricots will look more like these dried figs in colour.
They still taste sweet and delicious without the additives.
*I made two different batches. One with figs + apricots and orange juice and the second with figs + cherries and lemon juice. All other ingredients were the same


This next part isn't for the weak of heart.....
My Cuisinart food processor died a painful death a few months ago so........
I had to make a choice, chop up itty bitty by hand which wouldn't give me the texture I wanted or.....
put a bunch of dried fruit into my new Ninja Blender and close my eyes and hope for the best.
I warned you, scary right?! I've heard horror stories that will keep you up at night about people who have tried to blend dried fruit in their blenders and they broke insantaly. A crime I tell you.

So did my Ninja hold up?

YESSSSS! I only had a few tablespoons of liquid to add along with the dried fruit and nuts so I started getting nervous, cold sweats even after I pushed my luck and added the apricots to the pureed figs. Alas, there were tiny bits of apricots in my perfectly pureed fig mixture. I've got to get me another food processor!

Good Boy!
This is what your filling should look like. Pretty thick.


My Recipe:
TIME  15 MINUTES PREP, 30 MINUTES BAKE     YIELDS  12-15 BARS
Old-Fashioned Fig Bars

Filling:


8 ounces dried Figs (preferably Organic)

4 ounces dried Apricots OR dried Cherries (preferably Organic)

2 tbsp. chopped almonds

2 drops anise extract (optional)

1 tbsp. agave nectar (or other liquid sweetener such as pure maple syrup or honey)

2 tbsp. water

2 tbsp. orange juice OR lemon juice

1/4 tsp. cinnamon

1/4 tsp. ginger


Snip off the figs' stems, and put them, the apricots, and the almonds into the food processor. Grind to a coarse paste. Stir in the remaining filling ingredients and process until mixed. Set aside.


Crust:

*1 cup regular or quick oats, ground in blender until fine

*1 cup regular or quick oats, uncooked (not instant oatmeal)

1 tablespoon flax meal

1 teaspoon baking powder

1/4 teaspoon salt

4 ounces unsweetened apple sauce

3 tbsp. agave nectar (or other liquid sweetener)

1/4 cup water

* I use Coaches Oats Brand which is a Whole Grain and tastes toasted and yummy!


Directions:
Preheat oven to 375 F. Combine the dry ingredients in a mixing bowl. Stir in the wet ingredients, mixing well to a thick consistency. Press half the crust mixture into the bottom of an oiled, eight-inch square cake pan (use a wooden spoon or your hands). Spread the fig mixture evenly over the crust. Smooth the remaining crust mixture over the filling. Bake for about 30 minutes, or until lightly browned. Allow to cool completely before cutting into bars.


Makes 16 bars. Each bar (with almonds) contains: 117 Calories (kcal); 1 g Total Fat; (10% calories from fat); 2 g Protein; 26 g Carbohydrate; 0 mg Cholesterol; 67 mg Sodium; 4 g Fiber


PRINTABLE VERSION OF THIS RECIPE